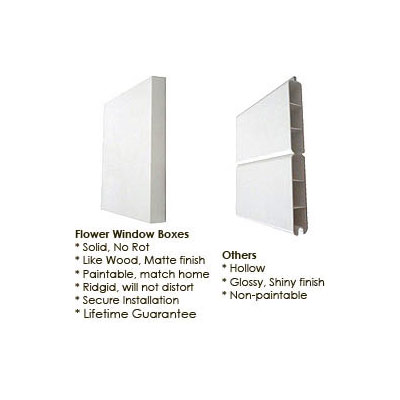
- Available in Standard size or an Extra Large (XL) size
Standard Dimensions: 8” High x 8” Wide x 72" Long
XL Dimensions: 10" High x 9.25" Wide x 72" Long
SHIPS FULLY ASSEMBLED
Installing our Window Boxes on Siding (Below):
Installing our Window Boxes on Brick (Below):
DIRECTIONS FOR INSTALLING WINDOW BOXES
Tools Needed:
* Drill ("hammer action" may be necessary if drilling through brick/rock)
* 5/8" Regular drill bit
* 5/8" Masonry drill bit (brick/rock only) OR 1/4" Regular drill bit (siding/stucco)
* 3/8" Lag bolts (2 for small box, 8 for large box, 3-6 for medium boxes)
* 2" Washers (must fit lag bolts)
* Wrench
* 5/8" Lead anchors (brick/rock only)
* Caulk
* Level
WARNING: The following are the manufacturers recommended
installation method. Note that it is recommended that you have a
handyman, carpenter, or other professional install these window boxes to
maximize your safety. The manufacturer of these window boxes claims no
liability or responsibility for damages due to improper installation.
Step 1: Remove your window box from the packaging.
Step 2: Located on the back of your window box various
"penny-sized" marked circles 5/8" in diameter (if no circles are marked
call the manufacturer). Before you drill a hole through the box where it
is marked, you need to ensure that the placement of this hole is
adequate to match your window. If you will be installing on stucco or
siding, it is recommended that your holes drilled overlap a stud (you
will likely modify the placement of the manufacturers pre-marked holes
by moving them left or right a few inches). Because this can vary
depending on the size of your window and how it was installed, please
consult with a local professional to determine the best placement. If
you will be installing on rock or brick, feel free to use the holes that
were pre-marked by the manufacturer, as you are not required to mount
to a stud.
Step 3: Drill a 5/8" hole in the proper locations on the back of your box.
Step 4: Hold the window box up to the window in the desired
location and with a pencil, trace through the drilled holes in the back
of the box so that you are transferring onto the walls of your house the
corresponding location of the holes on the box.
Step 5 - (Brick): Set the window box down. You will now need to
drill where you have marked. If are installing on siding or stucco,
please proceed to Step5 (Siding) Below. If you are installing on brick
or rock, then hammer drill with a 5/8" hammering bit over the marked
spots roughly 3-4 inches deep. Fill the hole with a silicone caulking.
Place a 5/8" expandable lead anchor shield into the hole. Make sure this
lag anchor is sized to receive a 3/8" lag bolt (there are many sizes).
Step 5 - (Siding): If you are installing on stucco or siding, you will need to
pre-drill a 1/4" hole where marked on the house. It is imperative that
this hole be located over a stud to ensure maximum strength. Fill the
hole with a silicone caulking. Proceed to Step 6 below and ignore the
use of anchors related to Brick installation in Step 5 (Brick).
Step 6: Hold the window box back up to the window. The holes in
the back of the box should overlap the anchors in the house. You are now
ready to tighten the lag bolts with a large washer over the lag bolt
and on the inside of the box (make sure the washer is between the head
of the lag bolt and the inside of the back of the box before
tightening).
Step 7: Prior to fully tightening the lag bolts, you may wish to
place a level in the box to check for levelness. With the lag bolts
tightened 90%, adjust one end of the box till level then finish
tightening the lag bolts securely. This will maximize proper drainage
for your window box.
Step 8: Caulk around your window box to seal it up and keep
water from getting behind it. Caulk over the screw heads as well. This
makes them water tight and prevents water and dirt from getting behind
the box.
BRACKET INSTALLATION INSTRUCTIONS
*PVC glue/cement (optional)
*1-1/4" or 1-1/2" screws (2 per bracket - optional)
*Caulk (optional)
Please note that brackets underneath are faux brackets that do
not support the box but are for decoration only. You can glue or screw
faux brackets to box at any time and usually after installation so that
they sit flush to the house. GLUE: Apply PVC glue/cement to top of
bracket. Hold to box for 2 minutes. Finish with caulk around the joint
where the bracket meets the box. Although optional, this will give it a
more professional look. SCREWS: Drill two 1-1/3 - 1-1/2 screws into base of
window box and into top of bracket to grab it. Finish with caulk.
Placement of brackets is at discretion of customer. CAUTION: Do Not
install window box brackets directly beneath a drain hole as this may
prevent drainage or cause water to get inside of the brackets and
oxidize.
PAINTING INSTRUCTIONS
*Exterior latex paint (color of your choice)
*Paint brush or paint roller
Tips for Prep-work
1.Avoid painting in direct sunlight on a surface that is too warm or heat blistering can occur.
2.Remove any water and dirt on the box first. Moisture trapped under
the paint can push its way out and cause moisture blistering/bubbling.
3.Do not use oil based paint. Make sure that your paint is a 100% acrylic latex paint.
4.Latex can take 2-3 days to dry. For this reason avoid exposing box
to dew, high humidity, moisture, or rain shortly after you have painted
the box. Painting in a damp basement or similar area can lead to
blistering or bubbling of the paint due to water being trapped inside or
under the paint prior to it drying.
It is easiest to paint your window box before installing to your
home. There is no need to prime, sand, or prep your window box. Paint
directly on window box with a brush or roller using any exterior grade
latex paint. There is no need to paint the back of the box. DO NOT PAINT
INSIDE OF BOX, YOU WILL PLANT DIRECTLY INSIDE. If you prefer, you can
paint an inch down to where the
dirt line is. Oil based paints will not work. It's ok to use a
professional spray system and spray the latex paint on or you can simply
brush or roll the box. Let paint completely dry before installing to
your home .
PLANTING INSTRUCTIONS
*Optional - Self-Watering Reservoir
*Optional - Rocks, pebbles or Styrofoam peanuts (lighter material)
* Optional - Landscape fabric
*Optional - Soil Moist, or other water absorbing material
* Potting soil
Step 1: Install the window box in desired location.
Step 2: Use either method below or both.
Black Landscape Method
Step 2a: Place a layer of landscape fabric. This will act
as a filter to capture soil prior to water exiting from drain holes.
(proceed to step 3)
Pea Gravel Method
Step 2b: Place a layer of rocks or pebbles. This will act
as a filter to capture soil prior to water exiting from drain holes.
(proceed to step 3)
Step 3: Place your Flower Window Box Self-Watering Reservoir inside of window box.
Step 4: Add nutrient rich potting soil to your window box. Fill up to and within 1 inch from the top of your window box.
Step 5: Proceed by adding your choice of flowers, plants, herbs or seeds.
|