How to Install PVC Forever ShuttersTM on Siding with Hinges
How to Install PVC Forever Shutters TM on Brick with Screws
How to Install Cedar Shutters with Hinges
How to Install Cedar Shutters on Brick with Screws
Measuring Windows for Exterior Shutters
The first step before you even
measure your windows for exterior shutters is to decide
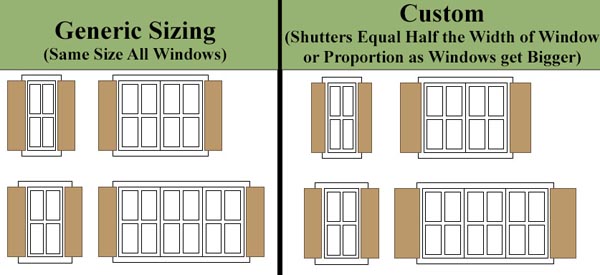
whether or not you want standard generic size shutters or custom
shutters for your window. The difference is as follows (read and see
diagram):
1. Generic or standard shutter widths and sizes: Simply going with the same width shutter on every window, typically 15"
2. Custom outdoor shutter sizing: Getting composite exterior shutters to match the size of the window or in
instances where the window is too large you will simply get
proportionally larger shutters for larger windows (See diagram below)
Nowadays, windows are made so custom that many times they can be 6', 8',
10 foot long and even longer. This just was not the case in the old
days. For this reason it is common practice to simply get
proportionally larger shutters for instances of windows exceeding 4 feet
wide. It's usually not practical to put 5 foot wide shutters on either
side of a 10 foot window.
Our recommendation for custom shutter sizing is to put 18" shutters on windows
sized 3-4 foot wide and 22" shutters on windows larger than that. For
windows smaller than 3 feet we generally recommend half the width of the
window. This will give the look of the shutters in the diagram on the
top right. For non-custom generic measuring you will only need to
measure the height of the window to get the sizes you need and you will
pick a width that you feel best matches the windows on your house, most
typically 15" wide.
To measure the width of the window, simply take a tape measure from one
end to the other. Do not include any trim around the window in your
measurement. You want to imagine that your shutters could close and
cover the window up. The parts of the window that you are logically
covering up are what you are measuring. Once you've measured your
shutters and ordered them, then it is time to paint them and install
them or you can order any of our exterior shutters prepainted in one of
our
20 factory colors.
How to Install PVC Exterior Shutters with Hinges
The
following are directions if you are
installing our exterior shutters on
hinges
. Please note that PVC shutters are designed to remain open at all
times held down by the shutter dog and installed as listed below.
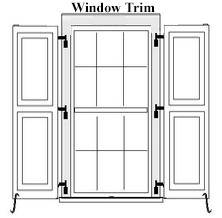
Exterior Shutters
are installed on 2-3 hinges which sit atop "pintels" screwed into the
window frame. A shutter pintel is the male part of the hinge that
connects the hinge to the house, offsets the shutter from the trim, and
provides a pivot point for the hinges to rotate. Pintels
come
in three sizes: siding, brick, and rock. Siding generally sticks out 1
1/4" from the home. Brick sticks out 2 1/4" from the home and rock
sticks out 4 1/16 inches from the home. The wrong pintel will not allow
the shutters to offset the right distance and may keep the shutters from
lying fush or near flush on the house. Two hinges is enough to suffice
for shutters up to 47” height. However, for extra tall shutters up to
95” height you need to use 3 hinges/shutter for additional support.
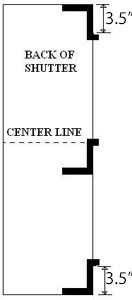
Step-by-Step Shutter Installation with Hinges:The first step is to attach the shutter hinges to the back of the shutter as
shown to the top right above. Keep in mind that each shutter has a
mirror partner and hardware will be attached in a mirror fashion for the
partner. It is recommended to flush the top and bottom hinges with the
top and bottom of the shutter so that the recommended pintel alignment
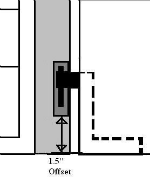
later on is correct. The next step is to attach the exterior shutter to the home.
To do this you want to secure the first pintel into the window first.
The 1.5” offset from the sill to the bottom of the first pintel is
recommended (see picture on left). Have the second pintel and a drill on
hand so that you're ready for the next step. Slide the shutter into the
first pintel to see where the proper location of the second pintel will
now fall. While holding the shutter over the first pintel, place the
second pintel through the hinge and screw into the windows reveal.
Finally, slide any remaining pintels into place for the remaining hinges
and screw into place as well.
An
S-Shaped piece of hardware called a shutter stay or shutter dog is used
to hold the shutter open. It is installed in the bottom opposite corner
directly to the home as well. Use lag anchors to hold them for brick or
rock. For siding, simply pre-drill a smaller 1/4" hole and tighten the
shutter dog in place.
The final step is installing a hidden metal L-bracket in the top
opposite corner of the shutter to secure it to the home and keep the
shutter open. Screw the metal bracket into the siding first with a 2”
screw, such that it just clears the top of the shutter. Now drive a 2”
screw down into the top of the shutter. This will secure the shutter
down in the opposite corner
How to Install Exterior Shutters on Brick or Siding with Screws
WARNING: DO NOT ATTEMPT TO GLUE OUR SHUTTERS TO THE HOUSE. USE FASTENERS ONLY!!
! This alternate method involves screwing the shutters to the house instead of hinging them.
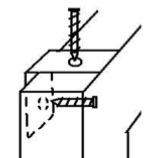
Installing exterior shutters on brick: You will need six 3" deck screws and corresponding plastic anchors per shutter. The idea is to screw each corner and 2 in the middle to the house and to predrill a 1/4" hole into the brick where each screw will go and slide a 1/4" plastic anchor into the hole to receive the 3" deck screws.
Installing exterior shutters on siding: then there is no need to use the plastic anchors for brick installation when a screw will hit a stud instead. If the screw is not going to hit a stud then the use of the anchor is recommended to give a better pressure fit. Simply screw into the siding and the plywood behind the siding. It is recommended that at least 3 screws hit the studs of the house to ensure a strong grab. Normally you would use a screw in each corner of the shutter and two in the middle. However sliding the location of the screws over a few inches in either direction is recommended if it helps you catch a stud. In some instances you may need to use 9 screws instead of 6 to catch the studs and to make sure you have screws in each corner and near the edges of the shutter. There should be 3 screws on each side at least within 3” from the left or right edge.
Using the shutter as a template: The first thing you need to do is to use the shutter as a template. Hold the shutter in place and use a 1/8" drill bit to screw through the shutter at 6 different points. Make sure that as you screw through the shutter you then drill slightly into the brick behind the shutter enough to "leave a mark". When you take the shutter down next look to see if you can find the 6 marks you left on the brick. From there you can drill a 3" deep hole with a 1/4" masonry drill bit and put the plastic anchor into each of the six holes this way. If on siding and the hole is lined up with a stud there is no need to drill the 1/8” hole any larger it will suffice. If on siding and the hole is not lined up with a stud then drilling the 1/8” hole with a ¼” bit so that it can use a ¼” plastic anchor is recommended.
Plug Technique: You now are ready to hang the shutter using our Cortex plug and screw kits which come with screws and matching PVC plugs. Use the specialized bit that comes with the kit to screw the shutters to the house while also drilling a perfect hole that the plug will fit in. Next tap the plug in the hole till flush with a hammer and you’re done. Repeat for each screw.
Painting Instructions for Composite PVC Exterior Shutters:
Use any exterior latex paint of your choosing, however for fast drying/curing results we recommend using Sherwin Williams Pro Industrial Multi-Surface Acrylic in an eggshell finish. There is no requirement
to prime the shutters before painting as the
composite cellular PVC readily
accepts any exterior latex paint.
Click the Forever Shutters Paint Color Chart to see our available colors. We will also paint custom colors for local customers in the Atlanta market - there is a 5 pair minimum and the customer must provide us with the color in a Sherwin Williams formula. You will need to order by phone to do it this way.
Tips for Prep-work (Do-It-Yourself Painters) 1. Avoid painting in direct sunlight on a surface that is too warm or heat blistering can occur
2. Remove any water and dirt on the shutter first. Moisture trapped
under the paint can push its way out and cause moisture
blistering/bubbling.
3. Do not use oil based paint. Make sure that your paint is a 100% acrylic exterior latex paint. For the best result we recommend Sherwin Williams Pro Industrial Multi-Surface Acrylic Latex paint.
4. Latex can take 2-4 days to dry. For best result use Sherwin Williams Pro Industrial Multi-Surface Acrylic Latex label in an eggshell which works great for our PVC product. For this reason avoid exposing to
dew, high humidity, moisture, or rain shortly after you have painted the
shutters. Painting in a damp basement or similar area can lead to
blistering or bubbling of the paint due to water being trapped inside or
under the paint prior to it drying.
5. Paint directly on shutter with a brush or roller using Sherwin
Williams exterior latex or other exterior latex paint. Let paint
completely dry before installing to your home.


 Shutters
are installed on 2-3 hinges which sit atop "pintels" screwed into the
window frame. A shutter pintel is the male part of the hinge that
connects the hinge to the house, offsets the shutter from the trim, and
provides a pivot point for the hinges to rotate. Pintels
come
in three sizes: siding, brick, and rock. Siding generally sticks out 1
1/4" from the home. Brick sticks out 2 1/4" from the home and rock
sticks out 4 1/16 inches from the home. The wrong pintel will not allow
the shutters to offset the right distance and may keep the shutters from
lying fush or near flush on the house. Two hinges is enough to suffice
for shutters up to 47” height. However, for extra tall shutters up to
95” height you need to use 3 hinges/shutter for additional support.
Shutters
are installed on 2-3 hinges which sit atop "pintels" screwed into the
window frame. A shutter pintel is the male part of the hinge that
connects the hinge to the house, offsets the shutter from the trim, and
provides a pivot point for the hinges to rotate. Pintels
come
in three sizes: siding, brick, and rock. Siding generally sticks out 1
1/4" from the home. Brick sticks out 2 1/4" from the home and rock
sticks out 4 1/16 inches from the home. The wrong pintel will not allow
the shutters to offset the right distance and may keep the shutters from
lying fush or near flush on the house. Two hinges is enough to suffice
for shutters up to 47” height. However, for extra tall shutters up to
95” height you need to use 3 hinges/shutter for additional support.
 The first step is to attach the shutter hinges to the back of the shutter as
shown to the top right above. Keep in mind that each shutter has a
mirror partner and hardware will be attached in a mirror fashion for the
partner. It is recommended to flush the top and bottom hinges with the
top and bottom of the shutter so that the recommended pintel alignment
later on is correct. The next step is to attach the exterior shutter to the home.
To do this you want to secure the first pintel into the window first.
The 1.5” offset from the sill to the bottom of the first pintel is
recommended (see picture on left). Have the second pintel and a drill on
hand so that you're ready for the next step. Slide the shutter into the
first pintel to see where the proper location of the second pintel will
now fall. While holding the shutter over the first pintel, place the
second pintel through the hinge and screw into the windows reveal.
Finally, slide any remaining pintels into place for the remaining hinges
and screw into place as well.
The first step is to attach the shutter hinges to the back of the shutter as
shown to the top right above. Keep in mind that each shutter has a
mirror partner and hardware will be attached in a mirror fashion for the
partner. It is recommended to flush the top and bottom hinges with the
top and bottom of the shutter so that the recommended pintel alignment
later on is correct. The next step is to attach the exterior shutter to the home.
To do this you want to secure the first pintel into the window first.
The 1.5” offset from the sill to the bottom of the first pintel is
recommended (see picture on left). Have the second pintel and a drill on
hand so that you're ready for the next step. Slide the shutter into the
first pintel to see where the proper location of the second pintel will
now fall. While holding the shutter over the first pintel, place the
second pintel through the hinge and screw into the windows reveal.
Finally, slide any remaining pintels into place for the remaining hinges
and screw into place as well.
 An
S-Shaped piece of hardware called a shutter stay or shutter dog is used
to hold the shutter open. It is installed in the bottom opposite corner
directly to the home as well. Use lag anchors to hold them for brick or
rock. For siding, simply pre-drill a smaller 1/4" hole and tighten the
shutter dog in place.
An
S-Shaped piece of hardware called a shutter stay or shutter dog is used
to hold the shutter open. It is installed in the bottom opposite corner
directly to the home as well. Use lag anchors to hold them for brick or
rock. For siding, simply pre-drill a smaller 1/4" hole and tighten the
shutter dog in place.