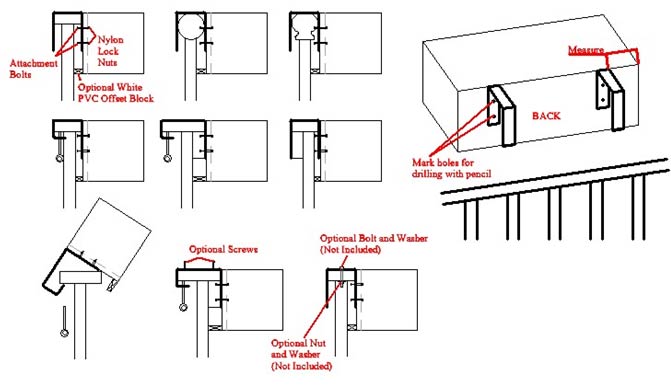
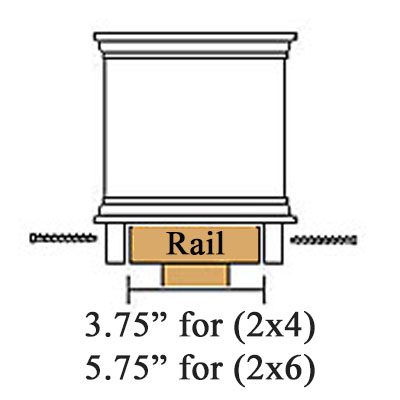
Step 2: Use screws (as shown in the diagram) to attach the rail top planter to the railing. If mounting through the base of your planter, it is usually recommended that there be approximately 1-2 screws along the center of the rail top planter. If mounting through the under strips, it is usually recommended that there be approximately 1-2 screws along each side of the under strips.
Painting Instructions for Rail Planters * Use ANY exterior latex paint of your choosing. There is no requirement to prime before painting as the composite PVC readily accepts an exterior latex paint. We recommend Sherwin-Williams Pro Industrial Multi-Surface Acrylic Exterior Latex Paint in eggshell finish for fastest cure times and superb adhesion.
* Paint brush or paint roller
It is easiest to paint your planter while empty. There is no need to prime or sand your planter. Paint directly on planter with a brush or roller using any exterior grade latex paint. DO NOT PAINT INSIDE OF BOX, YOU WILL PLANT DIRECTLY INSIDE. If you prefer, you can paint an inch down to where the dirt line is. Oil based paints and spray paints will not work. It’s ok to use a professional spray system and spray the latex paint on. Let paint completely dry before filling with potting mix. Store boxes in covered garage 2-4 days till dry.
Tips for Prep-work
1. Avoid painting in direct sunlight or on a surface that is too warm, or heat blistering can occur. Do not paint in freezing weather or temperatures below 55 degrees. Paint on days with 55 degrees and rising temperatures.
2. Remove any water and dirt on the PVC first. Moisture trapped under the paint can push its way out and cause moisture blistering/bubbling.
3. DO NOT USE oil-based paint or spray paints in a can. Make sure that your paint is a 100% acrylic exterior latex paint.
4. Latex can take 2-4 days to dry. For this reason, avoid exposing to dew, high humidity, moisture, freezing or rain shortly after you have painted the box. Painting in a damp basement or similar area can lead to blistering or bubbling of the paint due to water being trapped inside or under the paint prior to it drying.
5. Paint directly on PVC with a brush or roller using an exterior latex paint.
6. Do not store outside to dry!!! Leave in dry garage to dry until ready to install.
Planting Instructions for Rail Planters * Optional -
Self-Watering Planter Reservoir * Optional - Rocks, Pebbles or Styrofoam peanuts (lighter material)
* Optional -
Black Landscape Fabric (tightly woven). Available at most nurseries or box stores.
* Use quality Potting Mix. Potting mix is preferred over potting soil.
Step 1: Install the window box or place planter in desired location.
Black Landscape Method
Step 2a: Cut a strip of tightly woven black landscape fabric slightly larger than the inside bottom of box. Place a layer of landscape fabric first, on the bottom of box, underneath the reservoir and covering all the drain holes. This will act as a filter to capture potting mix prior to clean water exiting from drain holes so that potting mix does not spill through drain holes.
Pea Gravel Method
Step 2b: Place a layer of small rocks or pebbles. This will act as a filter to capture potting mix prior to clean water exiting from drain holes so that potting mix does not spill through drain holes.
Step 3: Place your Flower Window Box Self-Watering Reservoir inside of box on top of filtration layer (fabric or gravel). Wicks only need to stick out of the reservoir system about 1.5”. A good potting mix will draw water 6-8” from each wick. NOTE: For boxes over 12” tall, overtime roots grow deeper towards wicks and encourages deep root growth.
Step 4: Add potting mix to your box for best results. Fill up to 1-2 inches of the top of your box.
Step 5: Proceed by adding your choice of flowers, plants, herbs or seeds.
Step 6: Each time you water your box: First water and saturate your potting mix. Then pour water down your downspout if you have a reservoir system filling it. This will allow you to put 3x as much water in your box so that you water 1/3 as often. As potting mix dries out it will pull water from wicks out of the reservoir.
Step 7: Monitor first couple of weeks to see how often you should re-water your box as well as fill your reservoir system.