Measuring Windows for Exterior Shutters First
The First step before you even measure your windows is to decide
whether or not you want standard generic size shutters or custom
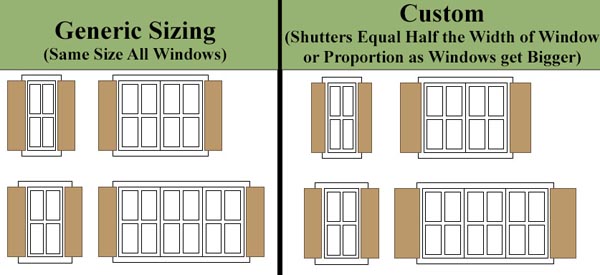
shutters for your window. The difference is as follows (read and see
diagram):
1.
Generic Sizing: Simply going with the same width shutter on every window, typically 15"
2.
Custom: Getting shutters to match the size of the window or in
instances where the window is too large you will simply get
proportionally larger shutters for larger windows (See diagram below)

Nowadays, windows are made so custom that many times they can be 6', 8',
10 foot long and even longer. This just was not the case in the old
days. For this reason it is common practice to simply get
proportionally larger shutters for instances of windows exceeding 4 feet
wide. It's usually not practical to put 5 foot wide shutters on either
side of a 10 foot window.
Our recommendation for custom sizing is to put 18" shutters on windows
sized 3-4 foot wide and 22" shutters on windows larger than that. For
windows smaller than 3 feet we generally recommend half the width of the
window. This will give the look of the shutters in the diagram on the
top right. For non-custom generic measuring you will only need to
measure the height of the window to get the sizes you need and you will
pick a width that you feel best matches the windows on your house, most
typically 15" wide.
To measure the width of the window, simply take a tape measure from one
end to the other. Do not include any trim around the window in your
measurement. You want to imagine that your shutters could close and
cover the window up. The parts of the window that you are logically
covering up are what you are measuring. Once you've measured your
shutters and ordered them, then it is time to paint them and install
them or you can order any of our exterior shutters prepainted in one of
our
20 factory colors.
Installation Directions for PVC Exterior Shutters

The
following are directions if you are installing our exterior shutters on
hinges. Please note that shutters are designed to remain open at all
times held down by the shutter dog and installed as listed below.
Exterior

Shutters
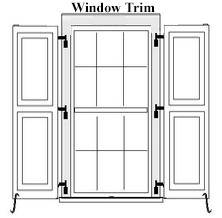
are installed on 2-3 hinges which sit atop "pintels" screwed into the
window frame. A shutter pintel is the male part of the hinge that
connects the hinge to the house, offsets the shutter from the trim, and
provides a pivot point for the hinges to rotate. Pintels
come
in three sizes: siding, brick, and rock. Siding generally sticks out 1
1/4" from the home. Brick sticks out 2 1/4" from the home and rock
sticks out 4 1/16 inches from the home. The wrong pintel will not allow
the shutters to offset the right distance and may keep the shutters from
lying fush or near flush on the house. Two hinges is enough to suffice
for shutters up to 47" height. However, for extra tall shutters up to
95" height you need to use 3 hinges/shutter for additional support.
Installation Steps: 
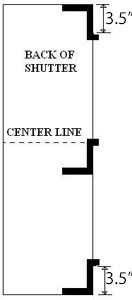
The first step is to attach the shutter hinges to the back of the shutter as
shown to the top right above. Keep in mind that each shutter has a
mirror partner and hardware will be attached in a mirror fashion for the
partner. It is recommended to flush the top and bottom hinges with the
top and bottom of the shutter so that the recommended pintel alignment
later on is correct. The next step is to attach the shutter to the home.
To do this you want to secure the first pintel into the window first.
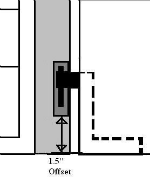
The 1.5" offset from the sill to the bottom of the first pintel is
recommended (see picture on left). Have the second pintel and a drill on
hand so that you're ready for the next step. Slide the shutter into the
first pintel to see where the proper location of the second pintel will
now fall. While holding the shutter over the first pintel, place the
second pintel through the hinge and screw into the windows reveal.
Finally, slide any remaining pintels into place for the remaining hinges
and screw into place as well.

An
S-Shaped piece of hardware called a shutter stay or shutter dog is used
to hold the shutter open. It is installed in the bottom opposite corner
directly to the home as well. Use lag anchors to hold them for brick or
rock. For siding, simply pre-drill a smaller 1/4" hole and tighten the
shutter dog in place.
The final step is installing a hidden metal L-bracket in the top
opposite corner of the shutter to secure it to the home and keep the
shutter open. Screw the metal bracket into the siding first with a 2"
screw, such that it just clears the top of the shutter. Now drive a 2"
screw down into the top of the shutter. This will secure the shutter
down in the opposite corner